April 27, 2004
Bento Love
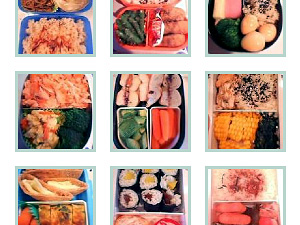
Mizuko Ito spends every morning in Los Angeles lovingly making bento lunch boxes for her two children and then documents her creations on her moblog. You immediately notice the care that goes into each balanced meal and how healthy the selections are compared to what we might have had for lunch everyday in grade school. You'll also notice, because she is Japanese, her children's lunches are heavily influenced by the Japanese palette. I don't know about you, but quail eggs, shumai, broccoli with mayonnaise, tamagoyaki, maki-zushi and tofu weren't regular stars in my brown paper sack. Now I may have happily eaten these dishes at home, but there was no way I'd let my Mom pack these things in my school lunch. Twenty years ago the average American wasn't familiar with such exotic and international food combinations, and if I were caught at school with Shrimp Chips (one of my favorites that my Mom tried to stuff into my lunch box on more than one occasion), my desperate attempts to fit in would've been futile. It's sad, really, how mean kids can be about unknown cultures, and it's even sadder that I cared so much. So I continually demanded the pimento cheese sandwiches with a side of cheese doritos, oh yeah and the string cheese stick. How I wish now I had taken the Tofu Fried Rice and Miso Soup for lunch instead.
It's nice to know that by the time I have kids, the lunches I might pack for them (no matter how "international" they might get) would never be a source of shame for them; that by then, people of all generations will have been exposed to and accepting of all different kinds of food cultures. Actually, it's probably already like that in school cafeterias across America now. I imagine that if you walked into a cafeteria today with Sushi rolls and Edimame for lunch they'd let you sit at the cool kids' table for sure.
April 24, 2004
Salted Cookies

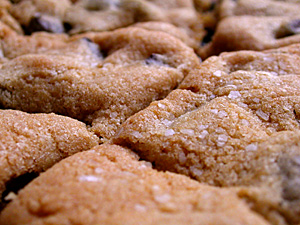
I love what big flakes of salt can add to different foods like pretzels, edimame, a medium rare steak, french fries. For a while now whenever I'm eating a chocolate chip cookie, I'd stop short of dipping it in a dish of salt and dream what a freshly baked chocolate chip cookie would taste like with a sprinkle of kosher salt on top. Surely someone had thought of this before. Well this afternoon I finally whipped up a batch and I think I fell in love.

I took out my tried and true Chocolate Chip Cookie recipe (thanks, Martha) and just sprinkled a bit of kosher salt on each cookie before popping them in the oven. I imagine you could use any favorite recipe you have, but I would recommend using a recipe that uses butter, not shortening, as the fat. Also, you have to use kosher salt and not table salt, otherwise the saltiness will be too harsh. The large flakes found in Kosher salt dissolve on the tongue more slowly and sweetly than the fine crystals of table salt do.

When they come out the oven the salt crystals lovingly embed themselves in the surface of the cookie, without completely dissolving, just waiting to burst on your tongue and contrasting the sweet chocolate chips. You might want to sprinkle a touch more Kosher salt on them after they come out of the oven so they are more visually appealing. Also, replacing the semi-sweet chocolate chips with dark or bittersweet chocolate chips and adding some chopped walnuts really compliment the slightly salty topping.
April 22, 2004
Consider Oolong

Surely you have seen those tiny asian teapots and teacups at the asian market. I always thought they were for display, or for altars to Buddha. But really, people use them to brew and drink tea in. Once I went to a fancy Chinese tea store in Houston when my aunt was in town. They brewed some delicious Osmanthus tea that cost $275 a pound and served it in tiny little porcelain tea cups. I just figured they weren't going to give us very much to taste since it was so expensive, but in reality many Chinese tea drinkers and monks drink fine tea in very small amounts just to get the aroma of the tea leaves and flowers in their mouth. Having grown up in Texas and being used to brewing tea by the gallons and ingesting just as much, this was a whole new concept to me. Since then I've learned the importance of brewing Chinese tea in small batches.
There are many ways to brew tea "correctly" and I'm sure those of the British persuasion have their own opinions, but I'm going to specifically explain how to brew Chinese Oolong Tea here, or at least how I learned how to do it from wrinkly old Chinese people.
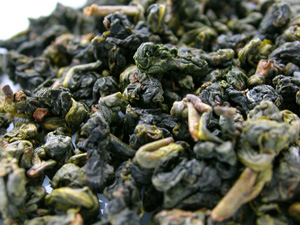
But first, here are some basics. If you didn't already know, Chinese Green Tea is green because the tea leaves are picked and dried naturally and then it's ready to be stored. Some green teas are fried in a special tea wok to remove the grassy taste. If the tea leaves are fully fermented it is Black Tea. Oolong tea is somewhere between Green Tea and Black Tea with the fermentation level being anywhere from 20%-80%. The taste of Oolong is also somewhere between Green Tea and Black Tea. It is only partially fermented, so you'll notice the color isn't as dark as Black Tea leaves, but it is deeper than Green Tea leaves. After a short fermentation, Oolong leaves are fried and rolled up into little balls like in the above picture. If you ever get Oolong Tea with small, flat, unrolled leaves, it's not a very good quality Oolong. Oolong means "Black Dragon" in Chinese and originated in the Fujian provence of China. Most Oolong teas available today are now made in Taiwan. It is highly regarded as the "champagne of teas" in both China and Japan. There was also once a beloved Japanese bunny named Oolong who had a fondness for buns.
So you should get some of the good Oolong Tea where the leaves are all rolled up. You should also use a porcelain teapot. Try to get one of those tiny Chinese or Japanese ones that come with small teacups and a tea tray. The tray is there for a reason and aids in the correct brewing of the tea. If you don't have one you can use a dish with a deep lip or a large bowl. If you are making more than one brew to serve several people (or you like to ingest hot tea by quartfulls) you should have a second tea pot to hold the brewed tea.
Method:
1. Set the teapot in the tea tray. Bring a pot of filtered water to boiling point. Fill and rinse the outside of the teapot with the boiling water letting the spillover catch in the tray. If you have a second teapot to hold the brewed tea, do the same to it.
2. Drain the water from the brewing pot and fill it about one third full of tea leaves.
3. Fill the pot with boiling water about halfway or enough to cover the tea leaves. Place the lid on and quickly drain the water out. You are basically rinsing the tea leaves to get them to unroll and ready for steeping.
4. Now fill the pot again with boiling water all the way until overflowing. For some reason everytime I've seen this done, they like to pour the water until it overflows all over the outside of the teapot. I'm not sure the reasoning behind this. I think it is to make sure the tea pot is completely full and there is no air trapped under the lid. In any case, make sure you keep the pot in a bowl or tray to catch the hot water.
5. Cover and steep for 45 seconds then quickly pour the tea into the teacups or into the second teapot to keep warm. Whatever you do, you don't want to oversteep. If you have a tea set with tiny cups, arrange the teacups in a circle on the tea tray or shallow bowl and quickly pour the tea into the teacups by moving the pot around in one continous circular motion, letting any spillover catch in the tray. (Making tea is very messy.) This is done so that every cup of tea gets a little bit of tea from the top of the pot as well as the bottom of the pot, ensuring that every cup tastes exactly the same.
6. Repeat steps 4 and 5 if you are brewing a second pot. For each additional brew of the of the same leaves, add 10-15 seconds to the previous steeping time to ensure that each brew tastes the same. Depending on the quality of your tea you can get 5 or 6 good brews out of good tea leaves. Some really expensive teas I've had have held up to 10 brewings.
I actually use this brewing technique for all good Chinese teas I have, but I'm sure there are some subtleties amongst the teas that tea masters would warrant reason to brew differently. Alas, I am no tea master. Sometime I just throw a few loose leaves in the bottom of my coffee mug and fill with hot water. Shame on me, I know.
April 19, 2004
Cake Undercover
Check out Frost Street's Soft-Boiled Egg Cake -- a lesson in food disguised as another food.
April 17, 2004
Ham and Split Pea Soup

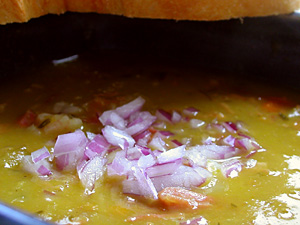
With a leftover ham from Easter, I made ham and split pea soup using America's Test Kitchen's recipe. There really isn't much that I changed (I don't like to mess with perfection) except I added 12 black peppercorns to the water with the ham and bay leaves, used fresh sprigs of thyme instead of dried, and added a few splashes of balsamic vinegar to the soup right at the end (instead of serving it as a garnish). The garnish of minced red onion adds a nice crunch to each spoonful and along side it I served a crusty baguette. Homemade croutons would be an excellent touch next time. Here is the recipe, straight from their web site:
ATK'S HAM AND SPLIT PEA SOUP
Use an entire small 2½-pound smoked picnic portion ham if you can find one. Otherwise, buy a half-picnic ham and remove some meat, which you can roast and use in sandwiches, salads, or omelets.
Ingredients:
1 piece (about 2½ pounds) smoked, bone-in picnic ham
4 bay leaves
1 pound (2½ cups) split peas, rinsed and picked through
1 teaspoon dried thyme
2 tablespoons extra-virgin olive oil
2 medium onions, chopped medium
2 medium carrots, chopped medium
2 medium stalks celery, chopped medium
1 tablespoon unsalted butter
2 medium garlic cloves, minced (about 2 teaspoons)
Pinch sugar
3 small red potatoes, scrubbed and cut into ½-inch dice (about ? cup)
Ground black pepper
Minced red onion (optional)
Balsamic vinegar
Method:
1. Place ham, bay leaves, and 3 quarts water in large stockpot or Dutch oven. Cover and bring to a boil over medium-high heat. Reduce heat to low and simmer until meat is tender and pulls away from bone, 2 to 2½ hours. Remove ham meat and bone from pot and set aside.
2. Add split peas and thyme to stock. Bring back to boil, reduce heat, and simmer, uncovered, until peas are tender but not dissolved, about 45 minutes. Meanwhile, when ham is cool enough to handle, shred meat into bite-sized pieces and set aside. Discard rind and bone.
3. While split peas are simmering, heat oil in large skillet over high heat until shimmering. Add onions, carrots, and celery and sauté, stirring frequently, until most of liquid evaporates and vegetables begin to brown, 5 to 6 minutes. Reduce heat to medium-low and add butter, garlic, and sugar. Cook vegetables, stirring frequently, until deeply browned, 30 to 35 minutes; set aside.
4. Add sautéed vegetables, potatoes, and shredded ham to pot with split peas. Simmer until potatoes are tender and peas dissolve and thicken soup to consistency of light cream, about 20 minutes more. Season with pepper to taste. (The soup can be refrigerated in an airtight container for 2 days. Warm soup over low heat until hot.) Ladle soup into bowls, sprinkle with red onion, if using, and serve, passing balsamic vinegar separately.

